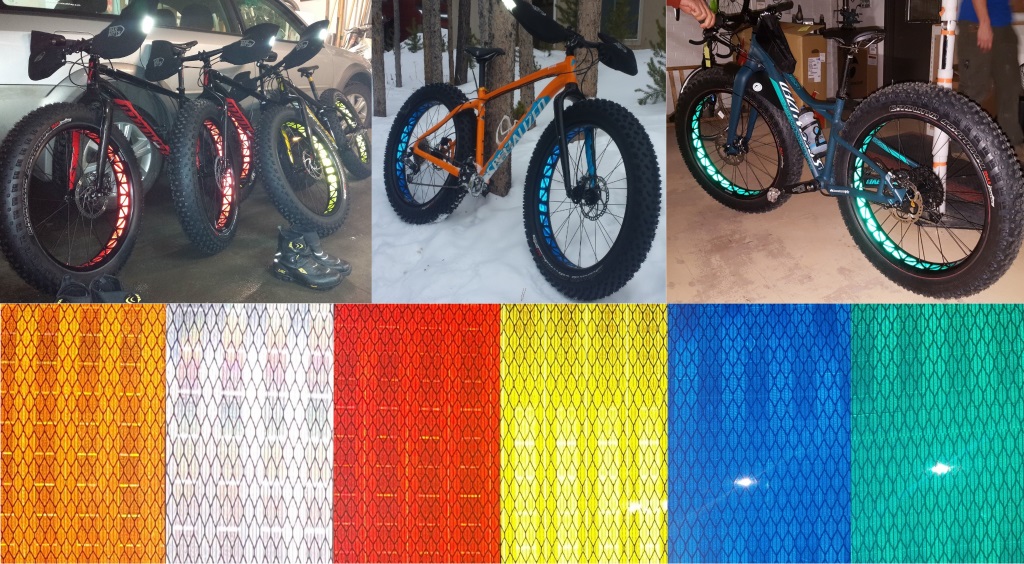
Why is the FattyStripper/SkinnyStripper system better than tape or split tube?
The FattyStripper/SkinnyStripper latex band is the simplest tubeless solution because it is a continuous elastic band that completely covers and seals your rim from both air and sealant. Just put on the valve, stretch it over the rim, inflate and trim the excess. It is the lightest solution available and thin enough to work on EVERY known rim available today. The best characteristic of the bands is that the super thin latex will bond with the tire's bead due to the pressure and latex sealant acting like a glue. This turns your standard clincher tire into a tubular-like tire that will not burp. You can roll very low pressures on off-camber technical terrain without fear of burping. That said... you can still dent your rim, so some common sense is required. ;^}
Q1: I live outside the USA. Do you ship internationally?
A1: Yes, FattyStripper has been making FatBikes tubeless in Canada, Norway, Sweden, England, Italy, France, Belgium, Australia, New Zealand, Scotland, Wales and Ireland. That reminds me... I need to book a trip to go "test" product!
International Shipping Note: PayPal can be picky about confirming addresses. Please confirm your address with PayPal and everything will work just fine. International shipping takes a while... I've seen it vary between 7 days and 19 days. I realize it takes a frustratingly long time in some countries/provinces (Quebec, Canada takes 2x longer than Norway for example) but there is nothing I can do without bumping up to Express shipping. Express shipping costs between $22-$45 depending upon location.
Q2: Do you have to change the BlingStrip or the FattyStripper latex band when you change a tire?
A2: No, you do not need to change the BlingStrip and it works just fine with tubes. The FattyStripper latex band bonds with the tire's bead to create the tubular-like tire. Trying to separate the latex from the tire is difficult, typically resulting in a latex band that is "challenging" to re-use on another tire. It simply isn't worth the $10/set to do this. When I take my Winter tires off, I keep the tire, latex and valve together/intact as one unit. I can inflate the tire off of the rim, which is why our system is the most reliable tubeless conversion available today. I use a fresh set of latex bands and valves for the Summer tires. Note:
Lately I have been rolling 29x3.0 for the Summer, so I just swap wheelsets and don't bother swapping tires. If you haven't tried 29x3.0 (I even have a set of 29x3.8 tires), do yourself a favor and give them a try!
Additional note: FattyStripper bands are less expensive than tubes... keep a spare set in stock.
Q3: What is the best way to trim the excess FattyStripper after the tire is installed?
A3: A sharp pair of fabric shears with a reasonably fine point works pretty well, but a long exacto blade with a sharp tip trims the rimstrip closer to the bead if you really don't want anyone to look close and see the rimstrip. Here is a link to the $1.29 Snap Blade razor I have been using from Ace Hardware.
Pull the excess band away from the tire so that it is decently stretched. When the knife point touches the latex near the rim, it cuts and retracts slightly into the rim hiding it nicely from view.
Q4: Is the "glue step" really necessary? Why do you do that step?
A4: No, its optional for sure. We no longer recommend this step. Once the latex is bonded to the tire's bead, it is too hard to separate without damaging the latex band. If you want to change tires (summer -> winter for example), we recommend using another tubeless valve and fatty stripper band... and leave the tire, FattyStripper/SkinnyStripper and valve intact as a complete tubular-like tire. It is easy to change tires once they have been set up!
Q5: How do the foam rods help me and how do I install them?
A5: The foam rods wrap around the center of the rim, up against each side's bead shoulder (not the actual bead). They effectively "build up" the bead shoulder with a firm but compliant foam rod that enables loose tire/rim combos to seat easier as well as prevent a catastrophic air loss if/when you roll the bead and have a "burp" at low pressure. The latex inherently attaches to the bead of the tire with sealant, but holding the latex up against the bottom of the bead keeps your tire pressurized even if you roll the bead off on a hard corner/rock strike while rolling low pressure. They work really well! IF you have a really, really loose tire/rim combo (like Turnagain and Bud/Lou), you may opt for the 5/8"dia rods you can get from the weather stripping section of your local hardware store.
Q6: What tricks do you have for seating a poor tire and rim combination?
A6: Some rims were simply not made to be tubeless. That doesn't mean they can't be tubeless, it just means they present more of a challange. Equally, some tires are made with very loose tolerances as well... and some tires stretch after being "over-pressurized" with pressures above 15 psi for extended periods of time. Regardless of the cause, the problem is that the tire's bead has too big of a gap to the rim's bead shoulder to generate any pressure inside the tire during inflation.
Luckily, we have a list of tricks to help you get your tire seated:
1) Pulling the core out of the valves is the most critical step. You simply can't get enough air flow through the valve stem with the core installed. Also, using a compressor with a trigger release allows you to "blast" air through the valve. This creates a pressure wave with the fast flowing air that can push the tire out to the bead shoulder and ultimately the tire's bead to the rim's bead hook.
2) Are the tires new? If so... often it takes a full day with a tube in the tire to get the crease out of the tire's bead.
3) Did you soap/lube the strip and the bead of the tire? Often, the soap/grease makes a great seal as well as helping the tire slide out to the bead.
4) Do you have the foam rods under the latex band in the center channel up against each bead shoulder? This helps build up the effective bead shoulder to reduce/eliminate air leakage during inflation. We ship 3/8" foam backer rods but 1/2", 5/8" and even 3/4" rods are available at your local hardware store in the weatherstripping section if you have a particularly loose bead/rim combo.
5) Try putting a 29" tube around the tire... or two 700c tubes. Don't inflate them, just use them as big rubber bands. If that isn't tight enough... you could put some air in those tubes too I guess (I've never tried that).
6) If necessary, put the 26" tube in and inflate to completely seat one of the tire's bead on the rim. Put the wheel on its side supported by a 5 gal pail. Carefully deflate the the tire while pushing on the side of the tire to release only one bead while keeping the other side's bead seated. Carefully remove the tube and put in the tubeless valve (core removed). Carefully turn the wheel over so that gravity helps pull the unseated bead down... and hit the valve with compressed air.
7) If putting the 29" tube over the tire doesn't unseat the seated bead... you can add that to the attempt above.
8) If all of that fails... try using 3/4" foam rods under the FattyStripper That's is the sure-fire way to get any combo seated.
Q7: How much pressure can the FattyStripper/SkinnyStripper latex bands and BlingStrips handle?
A7: This question involves a lot of variables. The size and shape of the cutouts matter to determine the stress on the materials. We have tested both the BlingStrips and the latex bands up to around 25 psi. FatBike rims and tires should NEVER exceed 15 psi for any length of time. Most tires list 20 psi as their Max Pressure, but after talking with some tire manufacturers about this spec, they said 20 psi was their Max Pressure ONLY during the tire seating process and that continuous pressure should stay below 15 psi. It is an incredible amount of force and quite frankly its dangerous to go above 15 psi. 27+/29+ cutouts are quite a bit smaller... so as long as the BlingStrip has a decent amount of overlap (5mm or more) on all sides, it'll handle 20 psi on a continuous basis without an issue. We have not performed long-term high pressure tests because rolling resistance of a FatBike tire does not decrease measurably above 12 psi. Rolling resistance only changes by 1W between 8 psi and 12 psi. IF you NEED to roll with pressures at 8 psi or higher, I would recommend adding a wrap or two of standard packing tape (doesn't stretch) around the BlingStrip to add quite a bit of strength while adding no measurable weight. A reminder from the installation instructions... The DT Swiss/Specialized rims that have the 10 little holes (1.5mm) right out at the bead should also be covered by a piece of scotch tape to protect the latex bands from the metal edges and perforation with high pressures. Rims without cutouts just need sharp edges covered to protect the FattyStripper when higher pressures are applied.
Q8: What do you use for an inflator?
A8: Here are some options:
https://www.amazon.com/gp/product/B082CH43LB/ $21.99
or
https://www.amazon.com/gp/product/B07RQ4FH6L/ $23.99
Extra schrader to Presta convertors:
https://www.amazon.com/gp/product/B07TWXZBCM/ $2.99
I have a twin head hose on my inflator so that I don't need an adaptor and it locks on.
https://www.amazon.com/gp/product/B002MKHR48/ $10.97
Q9: Do you have "Dealers"? How do you support Local Bike Shops?
A9: Yes. LBS' love FattyStripper because it such a reliable system that installs predictably and fast. Contact me directly from your bike shop email and we can discuss the "bulk pack". Jim@FattyStripper.com
Q10: How do I swap tires between seasons?
A10: I recommend taking your time and being patient. An extra 2 minutes per tire is all it takes to remove the tire w/FattyStripper intact.
1) Pull the core out of the valve.
2) Squeeze all the air out of the tire... as much as you can.
3) Put the core back in the valve so that it holds a "vacuum".
4) Remove the locknut from the valve.
5) Push the valve gently up into the rim, but don't push so hard that it pushes through the latex hole. It may only go up in partially for now.
6) Break the bead off of the rim all of the way around both sides of the tire.
7) Opposite of the valve, push the tire's bead into the center channel to help center the tire while pulling the bead up and off of the rim near the valve gently and slowly, using your fingers, work the bead off of the rim all the way around one side.
8) Gently work the valve up over the rim w/o pushing through the latex hole.
9) Remove the tire off of the same rim side that the first side came off of.
That's it.
Don't put more sealant in it... it'll be fine.
I usually inflate some to neutralize forces on the latex and then store the tire in a cool dark place for the summer.
Q11: How Yellow is your Yellow BlingStrip?
A11: That depends highly on the ambient light's temperature and intensity. It looks pretty yellow (not neon yellow) out in the sunshine and a bit on the warm/orange side of yellow indoors when viewed with warm incandescent or LED lights.
Q12: Which beer makes the installation the most fun?
A12: Tough call... but Mojo Risen from Boulder Beer does the trick for me if you can find it on a shelf (its only brewed in January). Its a lovely double IPA that has just the right amount of hops and finishes clean. 12.6% means that its a "light" beer. If you drink 2 of them... you're done. See... its a light beer.